Sebago fish story: The one that almost got away

So Scotty and I took Robyn, Winston and Aiden fishing. We’ve caught 30+ blue gills, but only 7 are keepers. Um, actually only 2 are keepers and the other 5 are debatable. Anyway, things are going great until my bad knot on the fish cage allows it to float away.

Well yesterday, Spike had lost the old fish cage, with a 2 lb bass in it. So this is our new floating fish cage. So all is not lost. The fish cage is 20 yds away, and everyone reels in while scotty pulls the anchor. While he does so, Scotty lectures the kids about the necessity of “never toss anything overboard that you haven’t checked is properly tied in. Fish cages and anchors.”

So we drift over to the cage and I retrieve it. As I tie it to the boat with a better knot, Robyn yells out “What is that rope in the water?”

Yes, the rope at the other end of the anchor, as it starts to sink for the final time. Scotty immediately dives in and manages to get a hand on it.

Problem is that we are now drifting away from him and he can’t get back. No problems. I’m an adult. So I try and start his boat.

Um, it won’t start. Turns over just fine, but coughs to a stop as soon as I let go of the key. Very consistent behavior. I have steered his boat, but never started it. Something I am missing.

So we all start yelling at each other, since we’re now 100 yds apart. And I still can’t start the motor.

Luckily Spike is in another boat a few hundred yds away. We yell at him to get Scotty, and he takes his sweet time reeling in and pulling in his anchor. He suggests we tell Scotty to tie the rope around his anchor. Nothing is crisis for our man Spike!

I look over at the kids and see Winston (Mister empathy) is in tears. Fears the worst and no one has said things will be ok. i try and tell him not to worry, but I am still trying to start the motor (and failing). and I am still yelling, since everyone is 100 yds away.

Finally I try some weird “get the starter going and slam it into gear” trick and the motor starts and I can head back to scotty. but spike gets there first and saves him. I pull alongside and all is recovered. But the kids had had too much excitement and just felt things had been too dangerous. Time to head for home.

We shall see how this fish story grows over time.

Heather MacDonald – Norwegian Doll

My Mom is a master dollmaker, and I was taking some photos of her dolls when we came across an old article she wrote for Doll Crafter magazine. I figured I’d scan the text and photos, so here it is. First, the pages from the original article. Second, the text and enlarged pictures.


——————–
The dollmakers in the Kansas City area know and respect Heather MacDonald for her fabulous costuming of dolls and the fact that she is such a nice person. Her interest in dollmaking and costuming began in the mid 1980s when a friend of hers wanted to buy a Christening gown for her grandchild. Heather looked at the simple gown with its steep price and thought she could make a lovely one for her own grandchildren. There had been an heirloom Christening gown in her own family. This gown turned out beautifully and she got the idea that it should be displayed on a life-sized doll. In the hunt for a doll she came across the doll studio of ThuTam Freeman in Parkville, MO. She signed up for a class and was so excited to be able to make a doll for the gown and was “hooked” from that time on. She has continued to take classes and make beautiful dolls and lovely costumes for them. She especially loves the research and finding out the history that is intertwined with the costuming. We look forward to having more articles from this talented costumer in Doll Crafter. – Editor
—————
I began the love of sewing and needlework as a child. My three sisters and I were taught the fine art of stitching by our mother. We learned to embroider and many other fine hand sewing techniques. I love traveling and studying the history of the areas that I have visited. It is so satisfying to me when I research a specific type of costume and then follow through on the creation of it.

This adventure began ages ago when the picture of an intriguing Folk Costume appeared in ‘What Dolls Wore Before’, a doll auction catalog and reference book for costumes by Theriault’s. I could just see a small girl all dressed up in that outfit and cute little bonnet, her fair curls shining against the dark fabric. I set out to find out more and it was a long journey. Mildred Seeley wrote that you should, “Always make your dolls as authentic as possible.” It some times takes a lot of hunting for information to accomplish this.

The original doll costume in that auction catalog had been labeled ‘Eastern Europe’, but it was not to be found anywhere there. The hunt for “my” costume that had started in the East, took me all the Way West to the North Sea. I came across dolls by Ronnaug Petterssen of Nolway on page 113 of the book titled “European Costumed Dolls” by Polly and Pam Judd. These were a boy and girl from the l930s in stylized folk costumes of the Hallingdal Region of Norway. The embroidery on both costumes was made with Wool threads. It was known as ROSEAUM embroidery in the Hallingdal River Valley region of southern Norway. This Was so lovely; I just had to reproduce these costumes for my dolls. All of those hours of leaming to embroider as a child were put to good use making these Folk costumes for my dolls. The dolls that I chose were both made from the same mold, the Sonnenberg Child that was a special DAG Convention mold by Seeley’s.

These costumes have used phrases such as Ethnic, Native Ethnic, Festival, Folk, Folkloric, Peasant, Regional and even National. No one word describes them all, but they do have much in common with other nearby countries of Europe, where many of these costumes have disappeared from everyday wear. Norway continues to have a very important place for their Regional Folk costumes. They are worn on very special celebration days such as weddings, Christenings, other celebrations and especially on May 16, which is the Norwegian Independence Day.

In days past Embroiderers and Textile Makers could have made the costumes from the different regions. The tradition of making these costumes has been handed down to each generation and a very particular style was adopted for each region. There are handwork guilds set up in each region and they govern the design, fabrics, embroidery thread, colors and other parts of the costumes. It is to protect the design of the costume and keep them all uniform. The Norwegians are extremely proud of their Regional Folk Costumes, which are called Bunads.

Silver jewelry is a very important element in many of the Folk costumes. The designs of pins, clasps and other jewelry were developed over time and adopted with the advent of the final design of the Bunad or Folk costume. There are Folk costumes for the men, with knickers as a choice. If they prefer, they can Wear long pants instead.

I used some design elements from the costume in Theriault’s book and some from the Petterssen’s doll costumes. It is very difficult to include all of the detailed work on a costume so much smaller than that of a person. But by including the most important elements in the right proportions, you too can make your very own treasure.

References:
1. What Dolls Wore Before by Theriau1t’s.
2. European Costumed Dolls by Polly & Pam Judd
3. Norwegian Bunads by Kjersti Skavhaug

————————-

Auto Service Recommendation. Overland Park KS

I usually take my cars to Kings Auto, on 95th & Antioch. They are very competent and I have no complaints…except that I spend a lot of money there. They find stuff, they fix it, it is expensive. What starts at $500 ends up $800. What starts at $800 ends up $1200. Nothing happens for less than $500. I’m not angry, I know my car needs works and work is expensive. But I’m always going ouch after getting my car back.

So I’ve been looking around for an alternative, and I may have finally found one:

Your Parts Or Mine
13314 W 89th Terr
Lenexa, KS, 66215
913-961-4369

These are a couple of brothers who work out of their home. They have a backlog … I had to wait a week until they could get me in … but I dropped the car off the night before, they worked on it the next day and got everything done, and I picked it up that night. The parts were straightforward and the labor was reasonable.

So far so good. The truth is that I didn’t check out their equipment, so I don’t know what they can and cannot do. But it has been a long time since I spent $500 on my car and felt that I got a good deal.

Instructions for downloading the SMS81 30 yr reunion DVD

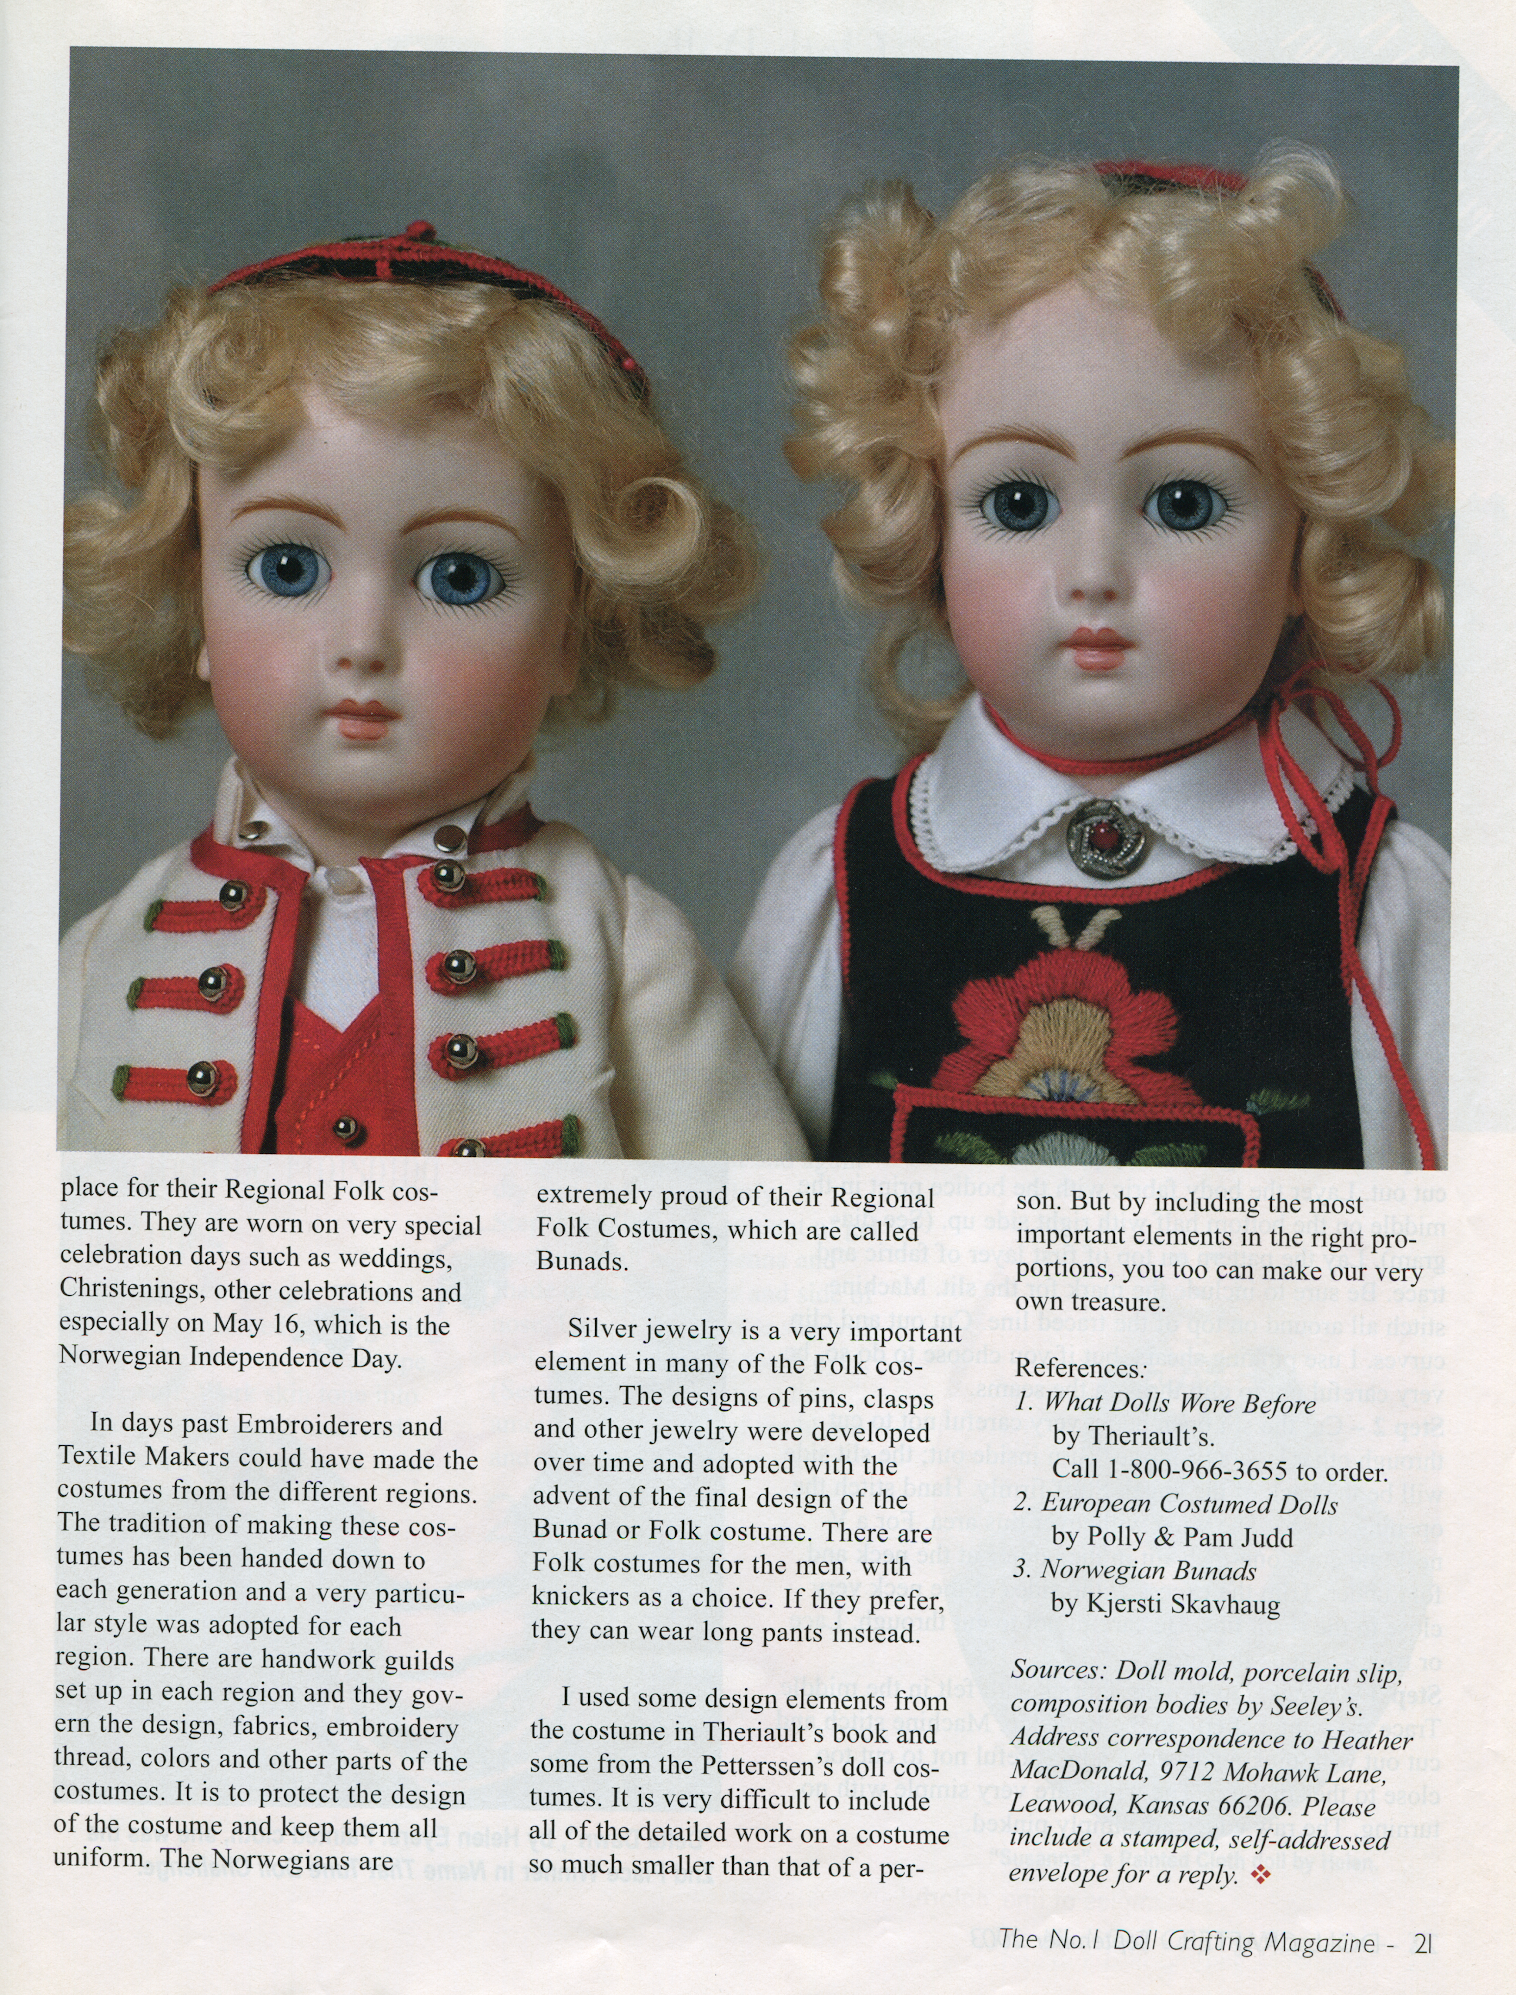
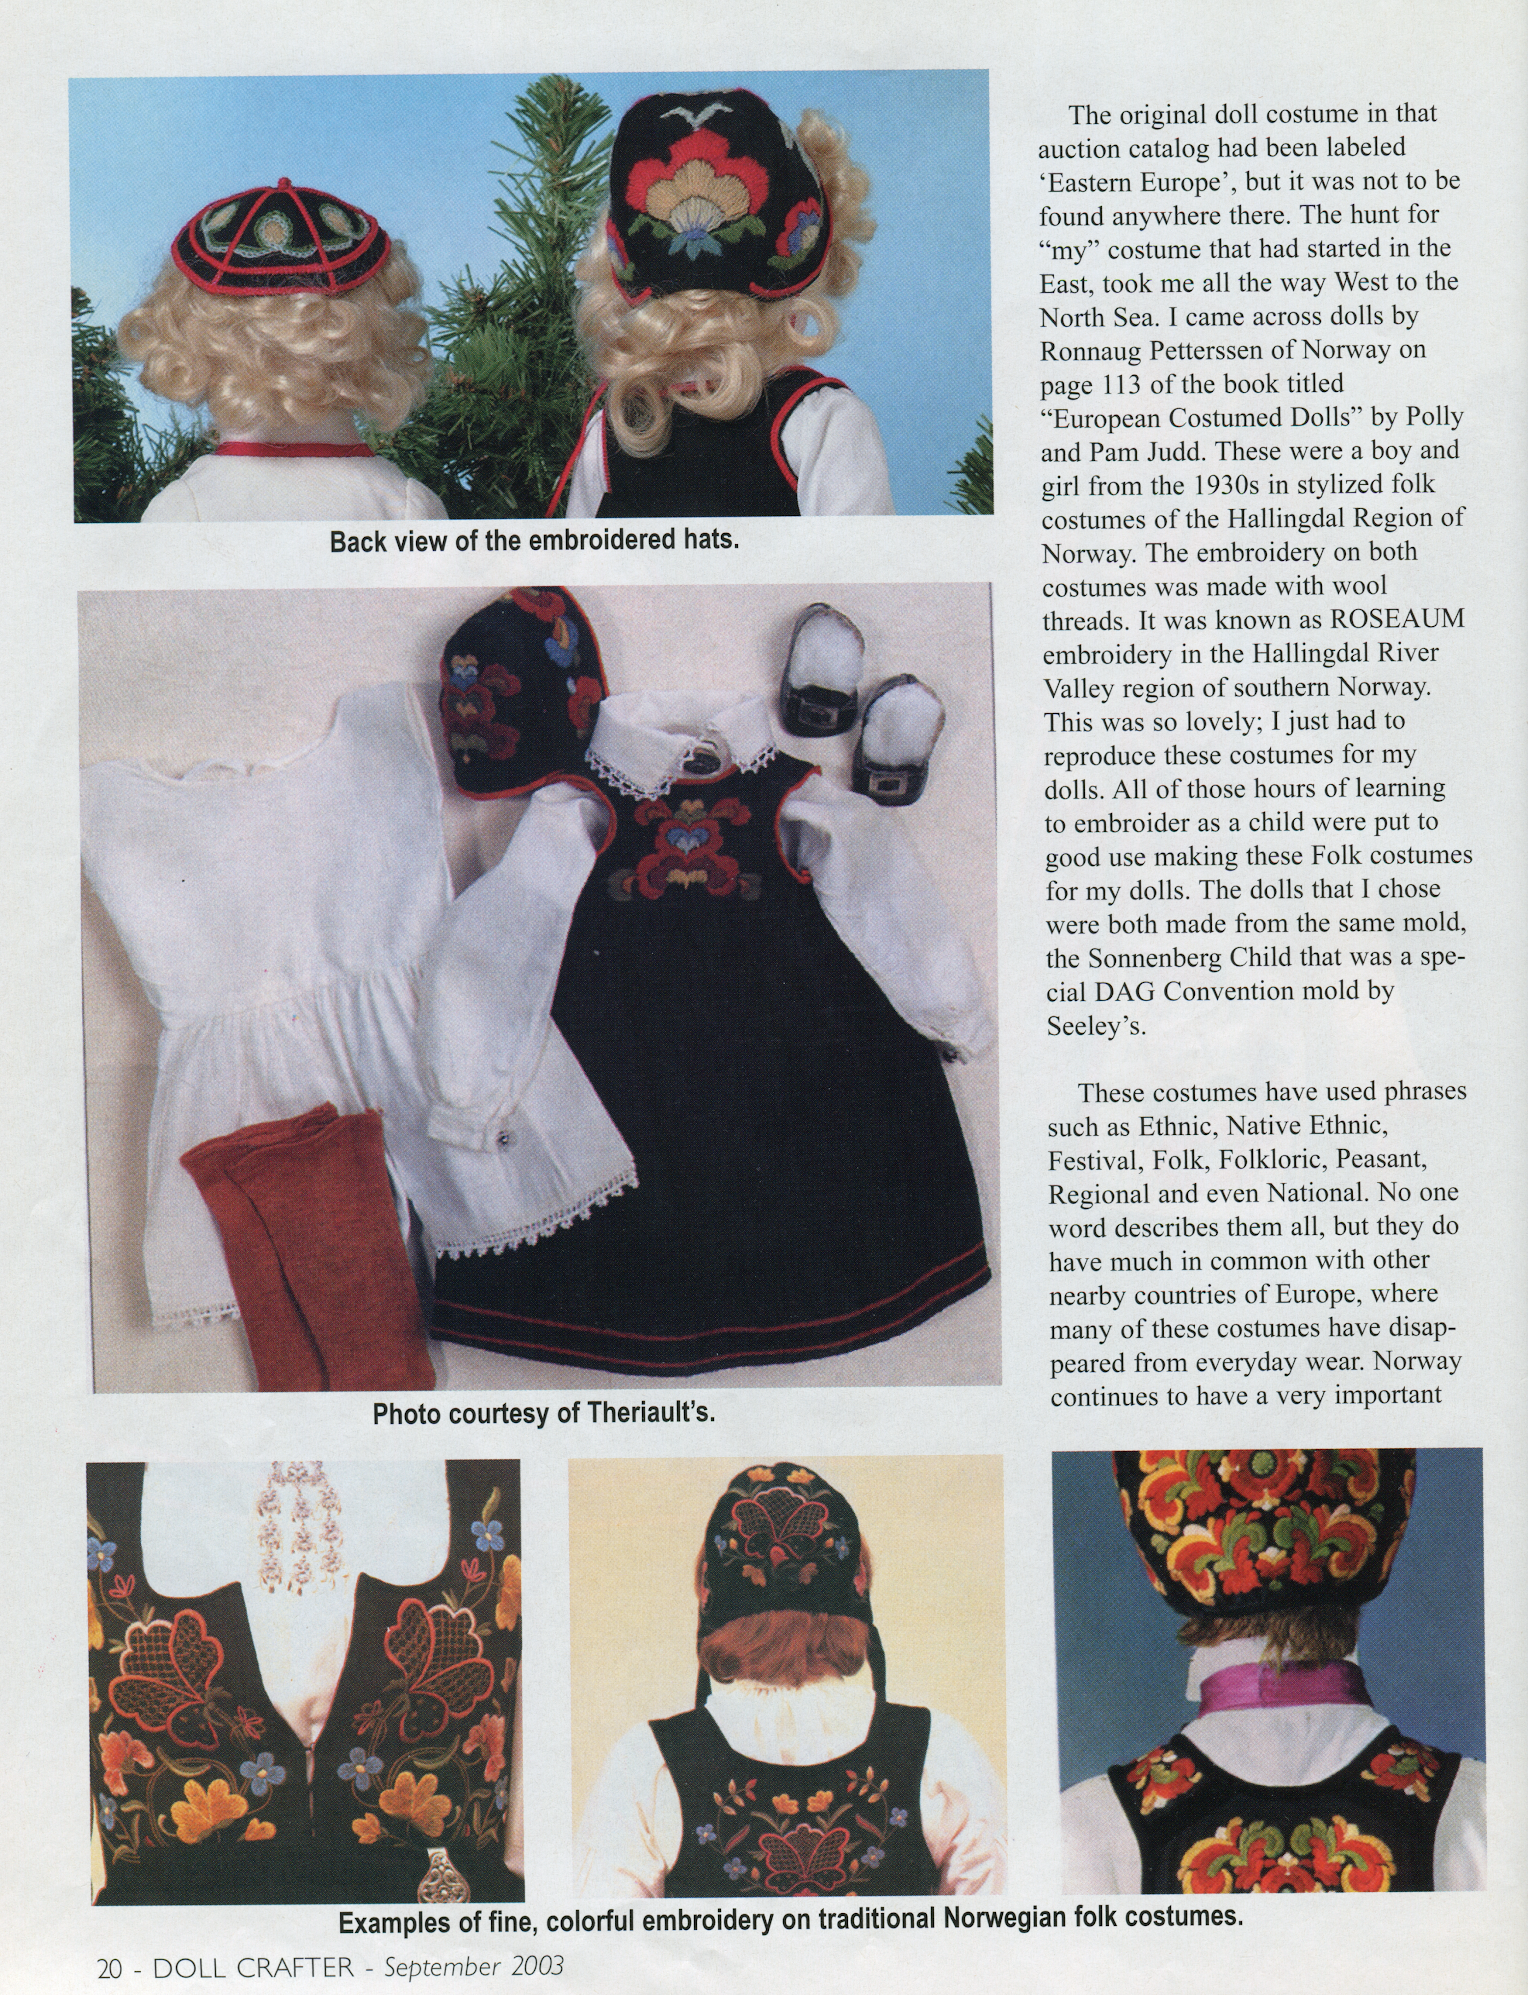
This note contains instructions for downloading the DVD for the Shawnee Mission South class of 1981, 30 yr reunion.

Sorry, but the video is not available online. We could have put it on youtube, but only if we split it into multiple segments. At some point, google will lift their “no video longer than 15 min” restriction, but at the moment this is the annoying problem. So you will have to download the video to your computer, then watch it on your computer or burn it to a DVD.

The DVD file can be downloaded from SMS81 Reunion DVD ISO file It is an iso file that you can view on your computer or burn to a DVD.

You computer-savvy people can stop here. You know what to do…

These remaining instructions are written for the computer novice. It may look complicated, but that is only because I write instructions poorly and I’m trying to cover worst-case-scenario situations. For 99% of you, this will be easy. For the other 1%, it isn’t really your fault.

Do you have kids of computer age? If yes, well have them take care of the rest of this and you go mow the lawn or do old-fogey stuff until they tell you they’re done. For the rest of you, follow along and good luck.
 
And if you have any problems, wish to offer advice, wish to bitch about the bad instructions, or merely wish to let us know you are alive, add a comment. (Instructions on how to comment on a blog post are beyond the scope of this note.)

Click the above link and you will be presented with a dialog, asking whether you want to save the file or open it. Choose the save option, and make sure you know where the file is being saved to. The file will be named reunion.iso.

The file is 1GB in length (this means large) and your typical broadband home will take 45 min or so to download it. Make sure you have room on your hard drive.

Once the file is downloaded, you need to decide whether you want to watch it on your computer, or whether you want to burn it to a DVD:

Burning the file to a DVD:

If you don’t have DVD burning software already installed:

To do this, you have to have a computer with a DVD burner And you have to have DVD burning software. If you don’t have a DVD burner, give it up and call your technical friend. If you do have a DVD burner but no software, go to link to free dvd burning software and install the program called ImgBurn. Note: Because Imgburn is free, it had to sell its soul to the devil, so it will ask if you want to add annoying junk to your computer system. But you’re smart and can say no to the devil, so when you see the following dialog, just turn off all the options. That is, do NOT install the Ask toolbar. Make your screen looks just like the picture below, with all checkboxes turned OFF.

And then all will be well. You have free CS and DVD burner software installed on your computer.

Ok, I have DVD burning software installed:

So now it should be as simple as double-clicking on the reunion.iso file and following the rest of the instructions. If double-clicking doesn’t work, open your DVD burning software and search for the “burn image” or “burn iso file” menu options, which will open a dialog, let you navigate and select the 
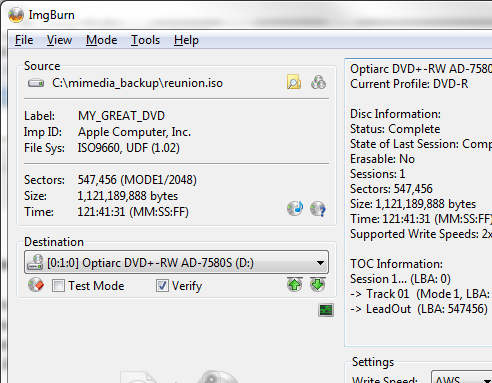
reunion.iso file, then follow the remaining instructions. You know … minor details such as “please insert a blank DVD into the drive” and so forth. I’d add some screen shots if they’d help, but it is different depending on which software you use. The ImgBurn software will look like this:

then this:

Honestly, it is easier than it sounds 🙂

Watching the DVD on your computer:

So now the file is downloaded and how to watch it… I have to admit you’re going to have to have some extra software on your computer to do this. Sorry, no choice. I’m going to suggest you install a program called VLC. VLC can read iso files and display them. In fact, VLC can read just about any audio and video file and play it, so it really is a program you should have anyway. The Swiss Army Knife of video.

1) Go to link to VLC video viewing program,
2) download and install the program VLC,
3) Launch VLC, then choose “Open File” and select the reunion.iso file.

Alternate 1) Or double-click on the reunion.iso file then choose VLC as the program you always want to use to open it. From then on, double-clicking reunion.iso will play the video.

(Alternatively, you can open iso files with winrar or even mount iso files with daemon tools, but this is outside the play-reunion-video-instructions-for-dummies course so I won’t go into any more detail unless someone asks.)

After all this, you should finally be at the point where you see this:

which is the starting of the video. And you should hear music playing. Congratulations. You see that orange text saying “Shawnee Mission South – 1981”? Well go click on that, and the video should start for you.

Good luck all. If you have any problems please post, as we’ll get it squared away as quickly as we can.