For photo work, I use Aurora HDR 2019 and Gimp. Within Gimp, I use the GMIC plugin a great deal, as it has the best noise reduction and hot pixel reduction.
The one big weakness of Gimp is lack of batch mode. You cannot record some action on an individual image, then save that action and apply it to a group of images.
And I do a lot of work on groups of images.
There is a heavy duty script processing engine in gimp, but I find it inaccessible. And I’m a programmer! The basic problem is that I am a lazy programmer and I really don’t need another language unless I really need another language.
Well there is BIMP for batch Gimp operation.
I’ve done practically no BIMP. The basic operations that BIMP provides I can can do in Irfanview.
Well I found myself needing to remove the hot pixels of a few hundred photos. The gmix function is remove_hotpixels. But this is the first time I have seen this documentation and the example is confusing. After reading this I thought I needed to write:
+remove_hotpixels _mask_size=3, _threshold=10,
And I tried many many options and nothing worked.
However, some of the simpler commands worked, so I knew it was just a matter of finding the right syntax.
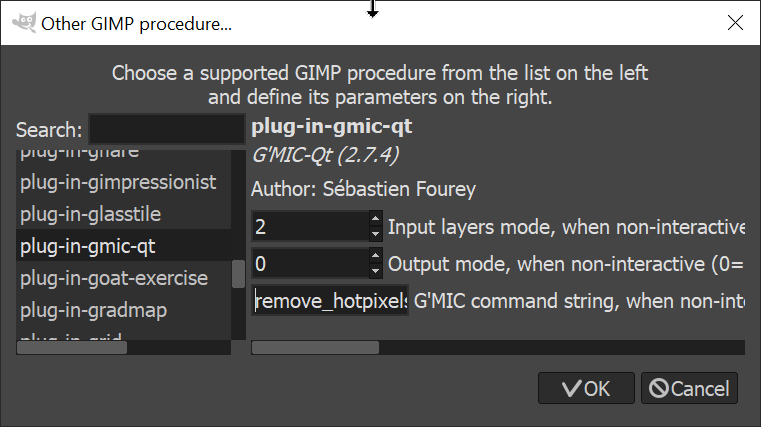
This post is to record what worked. The image below shows the successful Bimp settings. (Except the input field would not expand.)
The function name is plug-in-gmic-qt
The input layer is something besides 0 (holy crap, that just generated out with no changes whatsoever and was a real pita to figure out)
The output mode is 0. Maybe some other options work but 0 works.
The command line string is “remove_hotpixels 3 10“, where 3 is the mask size and 10 is the threshold.
Don’t use a “plus” or “minus”. Don’t name your arguments
Well that is it so far. Another inch of knowledge.
Update from 2020:
Well, I have given up trying to run batch gmic from within gimp. Too much of a hassle, too iffy, and far too slow.
Instead, I installed gmic, the command line tool. You can find it at https://gmic.eu/download.html.
Better to have a horrendously hard to figure out uphill battle from the command line than the same thing from within a clunky gimp dialog.
The positive from using a command line is that we have well known tools for iterating over multiple files. This is important because the “iterating over multiple files” part of the gmic command line doesn’t seem to exist. I can only figure out how to write a gmic script to read one file and write one file.
I can’t yet even figure out how to tell gmic to read a jpg and write a tiff.
But the “remove hit pixels” command is (on a windows platform, using “cmd”):
for /r %f in (.\*) do gmic %f ^

-remove_hotpixels 3,10,,,Merged ^

-o %f
From the command line, cd to the folder containing the files you want to convert and paste the above text. It will recursively find all files in this folder and all sub-folders. It will open each file, run the “remove hotpixels 3,10” command, then save over the same file. And it will do it orders of magnitude faster than the same thing in gimp with bimp.
I also find anisoptropic smoothing to be very useful. It is a nightmare trying to find the right combination of arguments to a gmic command. The best way is to setup the command in gimp then alter the settings to display the arguments. Still a pita, as you have to eyeball the text and re-type it into the command line; copy-paste does not work.
Here is a starting point for anisotropic smoothing:
for /r %f in (.\*) do gmic %f ^
-fx_smooth_anisotropic 80,0.7,0.3,0.6,1.1,0.8,30,2,2,0,1,0,0,50,50 ^
-o %f
The actual settings are listed here, but good luck converting the argument types to the integer command line values.
Not sure where the best documentation and tutorials for gmic are. Everything I have found requires you to know what everything means before being able to do anything. More notes added here as I learn.
https://manpages.ubuntu.com/manpages/trusty/fr/man1/gmic.1.html
http://gimpchat.com/viewtopic.php?f=10&t=19008
https://gmic.eu/tutorial/