Best tool for adding markup/annotations to images

I’ve started working on documenting our application. So I need to take screenshots of the windows, add them to a document, and write up what each window does. A useful and necessary part of that is a fast tool that lets me annotate an image with arrows and text. Maybe some rectangles. But nothing sophisticated.

The critical aspect is that you never get it right the first time. Or you change the layout of the application window and you need to redo the documentation. If you have to redo all the markup every time the layout changes, you are dead.

So what tool lets you open an image, create a new layer, add text and arrows to the layer, then save the document keep the layers separate so that you can replace the old image with a new image down the road? You also want to be able to select that text, change it and move it, and re-align the arrows.

Tools I considered:

  1. Gimp
  2. ShareX
  3. Paint.net
  4. Inkscape

The tool has to be obvious, because I might go away a year before I come back and have to work on it again. I am going to forget how to do it.

  1. Anyone who has tried to add a rectangle in gimp runs into a WTF: Why is it so difficult and non-obvious? There is no tool to “create a rectangle”. Instead you have to “select a rectangle” then “Fill selection outline”. I’ll never remember that. And it is hard too. Google how to add arrow plugins. I can do all that but it will take me hours to recall all the nuances. Sorry, I gave up after a few hours of crappy results.

  2. ShareX is fast and has excellent basic tools to do what I need. Unfortunately, once you save the file, all the work is lost. No layers. No way.

  3. Paint.net is excellent and fast. The only weakness is that objects are blended into the image as soon as you hit Enter. So you need lots of layers and will have to redo each layer when you re-edit. Doable.

  4. Inkspace does the job properly. Not trivial, and I am going to have trouble remembering how to get back to it (hence this post). But it has layers and keeps everything as Objects.
instantfield

I’ll get better but here are the basics:

  1. Start by importing an image. You can link or embed. Choose embed. Go to Document Properties and select “Resize to Content”.
  2. Create a single bezier curve with an arrow. Create some text. Make sure they are the same color.
  3. It is faster to copy and paste existing text and arrows than it is to get all the settings right over and over. If there is a way to make these values, I have yet to learn.
  4. Once you copy and paste the new values, editing is weird.

    a. For the Text, type the letter “T”. Then click on the text object. Then type new text.

    b. For the arrow, type the key “F2”. That puts it into an edit mode where you can click and move the start and end points.

For assembling the document and building the html (or pdf), I am using asciidoctor. I could not get the Eclipse plugin to manage complex nested documents. VS Code or IntelliJ-Community works ok.

RIP Chester Williams

The death of Chester Williams hit me very, very hard today. I’ve written before how much the World Cup Final between South Africa and New Zealand mattered … the subject of the movie Invictus. And how important Chester was to that victory and the future of South Africa. In how he delivered the first big tackle to Jonah Lomu that set the tone for the entire game. It was at that moment I began to believe we could somehow win. Chester carried a heavy weight on his shoulders as the sole black on the team. People worried he was a “token player” and it was a fair concern because he was the first black to make it. I’d been studying him intensely all tournament (who hadn’t?) and knew he deserved to be there. But sports can be cruel and heroics seemed too much to hope for. Then, as I saw Lomu shudder and collapse, I began to hope and believe … and hope and believe … and then simply hoped and prayed and hung on until the end … like all the players on both sides. The greatest game of all time in which no one could score.

I cried like a baby after that game — the only game that ever mattered so much — and the deepest tears were because of Chester. If we’d won but he’d been a liability on the field, it would have been a setback to a country’s future. Instead, he had the game of a lifetime. And whites experienced pride and love for the gift of a black man’s pure courage in an arena that they understood viscerally. Many for the first time. The celebration of Chester was perhaps the first, honest, positive feeling that all colours could experience together.

I am sorry he died so young. But he is a legend and had 24 years of that knowledge. I will never forget my admiration of and debt to him.

Aurora HDR 2019 – Questionable RAW support of Sony RX10M4

I’ve had support communication with Aurora about problems reading Sony RX10M4 RAW files, which they claim to handle. At the time, I was complaining about invalid cropping: The corners of a RAW image containing vignetting (the dark edges), and Aurora did not remove it. Aurora support said that this is normal operation.

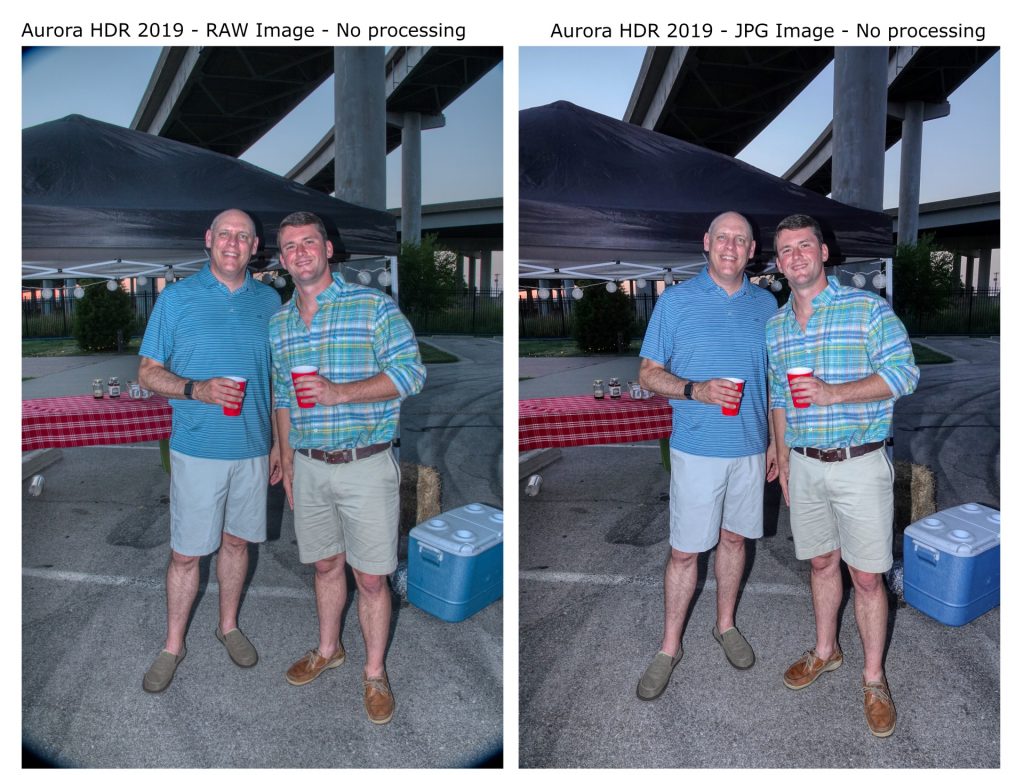
The following image shows this artifact. Same image in RAW and JPG processed by Auror without any subsequent processing. On the left is the RAW image and you can see the vignetting. On the right is the JPG image and you can see the vignetting was cropped and the image was enlarged to the same pixel dimensions.

Note that the JPG image was generated by the camera, i.e., I am saving in RAW+JPG format.

I also use the Sony Imaging Edge app to read RAW images on the computer and save them to JPG. When I do this with the RAW image, I get the identical JPG that is stored on the camera. So this tell me that Imaging Edge DOES choose to apply the vignetting when converting RAW.

Well I can live with this decision by Aurora. But that isn’t the full story. As you can tell, the above images are not the same otherwise. For example, the colors are different. Perhaps this is due to Aurora having better information from the RAW images and making more informed decisions. I can live with this too, if it is true. Color can be altered.

It is when you get to the details that the serious problems appear: 1. Aurora has made different decisions about the cropping/expansion. 2. The RAW image has bad noise artifacts. 3. The RAW image has chromatic aberrations.

Remember that the RAW image is stored with all the imperfections: The sensor itself has noise artifacts, chromatic and lens aberrations. But the RAW image also contains the information that lets the processor compensate for them. Aurora is not doing so.

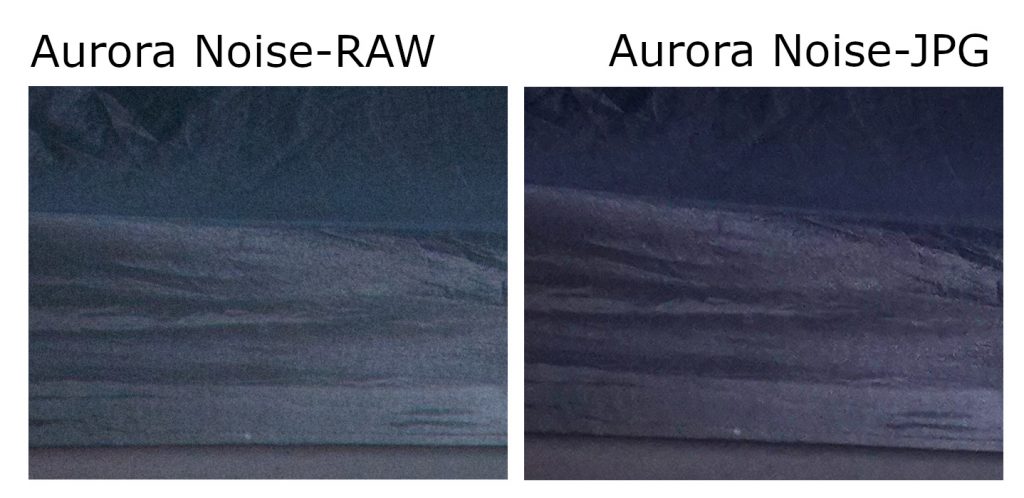
Look at a close-up image. Below is a portion of the tent on the left-hand-side. On the left the RAW image processed by Aurora. On the right is the exact same region from the JPG image.

ย 

First, we see that we have different shapes. This is what leads me to suspect that Aurora is not using the lens information to correct for it. (I am assuming that Imaging Edge IS correcting for it, as well as the in-camera software.)

Second, look at the noise. The RAW image contains a lot of noise. In comparison, the JPG has eliminated that noise, but now has JPG noise artifacts.

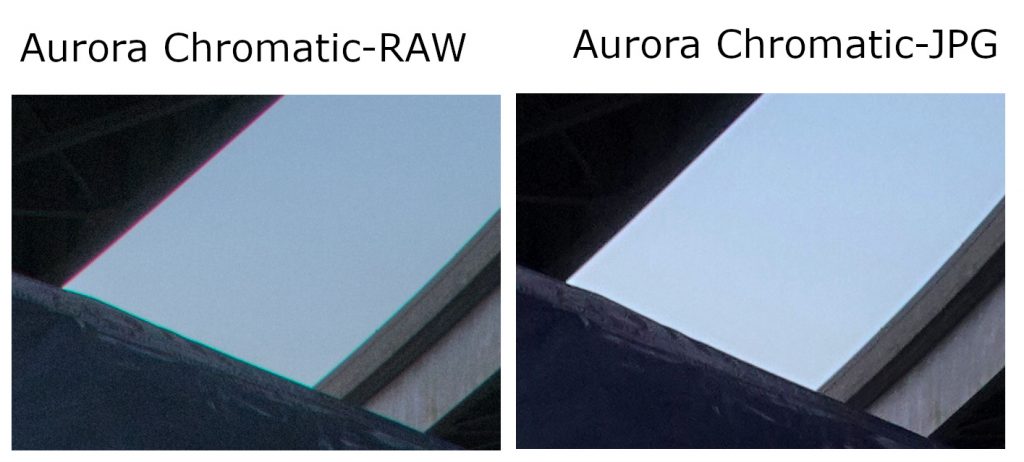
Another close-up image below, showing the noise problem again AND the chromatic problem. On the left, the RAW images show serious color error along the borders. The JPG image does not.

If Aurora is doing “correct” RAW image processing, I don’t want it. (This is why I am currently saving in RAW+JPG and only working with the RAW when I absolutely have to.) But really, I am seeing so many issues that I am not convinced that Aurora is processing the RAW correctly.

Back to tech support …

…Back from tech support. Confirmation that this is a bug.

Flaky Internet Connection? Gather the evidence first

So the home internet connection has become poorly this last month. Seems like a few times daily that everything just freezes up. Facebook posts don’t load, chrome just hangs, and within a minute my son is complaining that his xbox is down. I look at the AT&T router flashing its green lights, and then see a hiccup as the lights go out, the box makes an audible click, and the system reboots. A minute later and all is well.

Call the internet service provider and ask if anyone else in the neighborhood is having problems? Who isn’t? Have the service guy come out and poke around? It’ll work perfectly when he is here.

First things first. Gather the evidence. How often does the internet go down?

Should be a free program for that. I can launch a command line, type “ping -t 8.8.8.8” (see here), and see how things are going. Just need a timer (do it once every 30 seconds), and write to a log file so I can check it daily and see what it happening. 10 min to write a script for this, right?

But someone should have already written something like this. However, a google search for something ran into all sorts of problems. Lots of programs out there, but they charge? What? Or a free download and 30 days trial? No thanks.

Oh here is a free tool from a reputable site. Got all the right names, “Internet Connection Monitor”. But I installed this pita and the icon just sat there in my taskbar and wouldn’t load a window. Tried to uninstall it and windows locked up for about 5 min. Even revo-uninstaller is spinning its wheels. May have to reboot before deleting this poc. But enough about that.

Try Internet Connectivity Monitor. Does exactly what I asked for, doesn’t install anything (just run it out of the downloaded/extracted folder), and there you go.